The pursuit of hyper-realism in digital image manipulation continues to drive innovation within the photography and graphic design communities. A critical element often overlooked, yet fundamental to a convincing composite, is the accurate rendering of light and shadow. While precise masking isolates subjects, it is the integration of believable lighting and shadows that truly anchors an object within a new scene, making the composite virtually indistinguishable from a single-shot photograph. Recognizing this perennial challenge, KelbyOne instructor Dennis Dunbar has unveiled a sophisticated yet remarkably efficient Photoshop technique, dubbed "Steal That Shadow," which leverages existing natural shadows from original images to elevate the realism of composite photographs with minimal additional effort.
The Core Challenge: Believable Lighting and Shadows
In the realm of digital compositing, the objective is to seamlessly merge multiple distinct images or elements into a single cohesive visual. While advancements in selection tools and masking techniques have streamlined the isolation of subjects, the subsequent integration poses a more complex problem. The human eye is exquisitely sensitive to inconsistencies in light, perspective, and color. Of these, lighting, particularly the presence and behavior of shadows, often serves as the most potent indicator of an image’s authenticity. A shadow is not merely a dark area; it is a nuanced visual representation of the interaction between a light source, an object, and the surface it rests upon. Its angle, intensity, falloff, and interaction with various textures are governed by the laws of physics. Replicating these dynamics from scratch in a digital environment is akin to performing a complex physics simulation, demanding profound artistic skill combined with a deep understanding of light.
When artists attempt to "paint in" shadows, they often struggle with these intricate physical properties. Incorrect angles can make an object appear to float or be glued onto a surface. Inaccurate falloff (the gradual softening and lightening of a shadow as it extends from the object) or an inappropriate intensity can disrupt the illusion of depth and contact. The subtle interplay of ambient light filling shadow areas, or the way a shadow might slightly diffuse or warp on an uneven surface, adds layers of complexity that are exceedingly difficult to synthesize convincingly. This inherent difficulty often leads to composites that, despite perfect masking, feel artificial, undermining the entire creative effort.
Introducing the "Steal That Shadow" Technique
Dunbar’s "Steal That Shadow" technique offers an ingenious solution to this persistent challenge by sidestepping the need for manual shadow creation. It operates on the principle that the most believable shadow is often the one that was naturally captured in the original photographic setup. Many commercial product shoots, for instance, photograph items individually against a neutral background, often white, with carefully controlled studio lighting. In such scenarios, the object inevitably casts a shadow. Rather than discarding this valuable information during the masking process, Dunbar’s method advocates for its preservation and strategic re-integration.
The technique capitalizes on a specific Photoshop blending mode, ‘Darken,’ in conjunction with a precise ‘Curves’ adjustment layer, clipped to each shadow layer. This combination allows the user to isolate and extract the natural shadow from its original background, effectively "stealing" it, and then seamlessly introduce it into a new composite scene. The elegance of this approach lies in its simplicity and its foundational reliance on actual photographic data, ensuring that the critical attributes of the shadow—its angle, intensity, and falloff—are inherently correct because they are real.

Case Study: Anthony Nex’s Razor Project
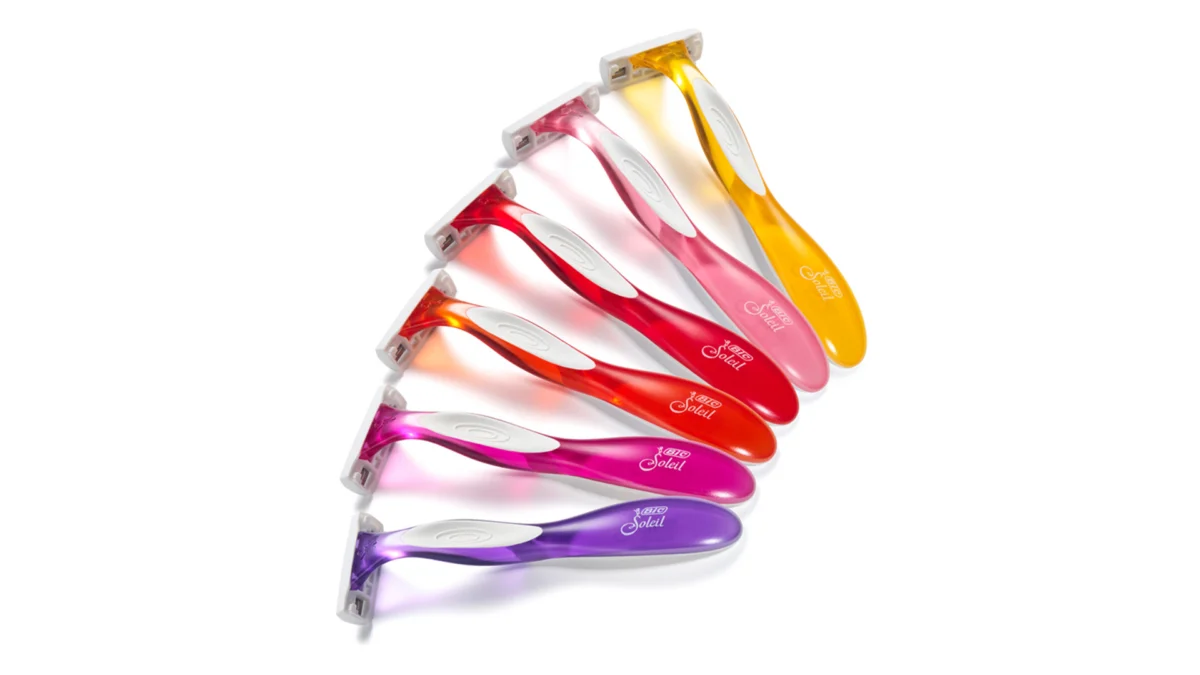
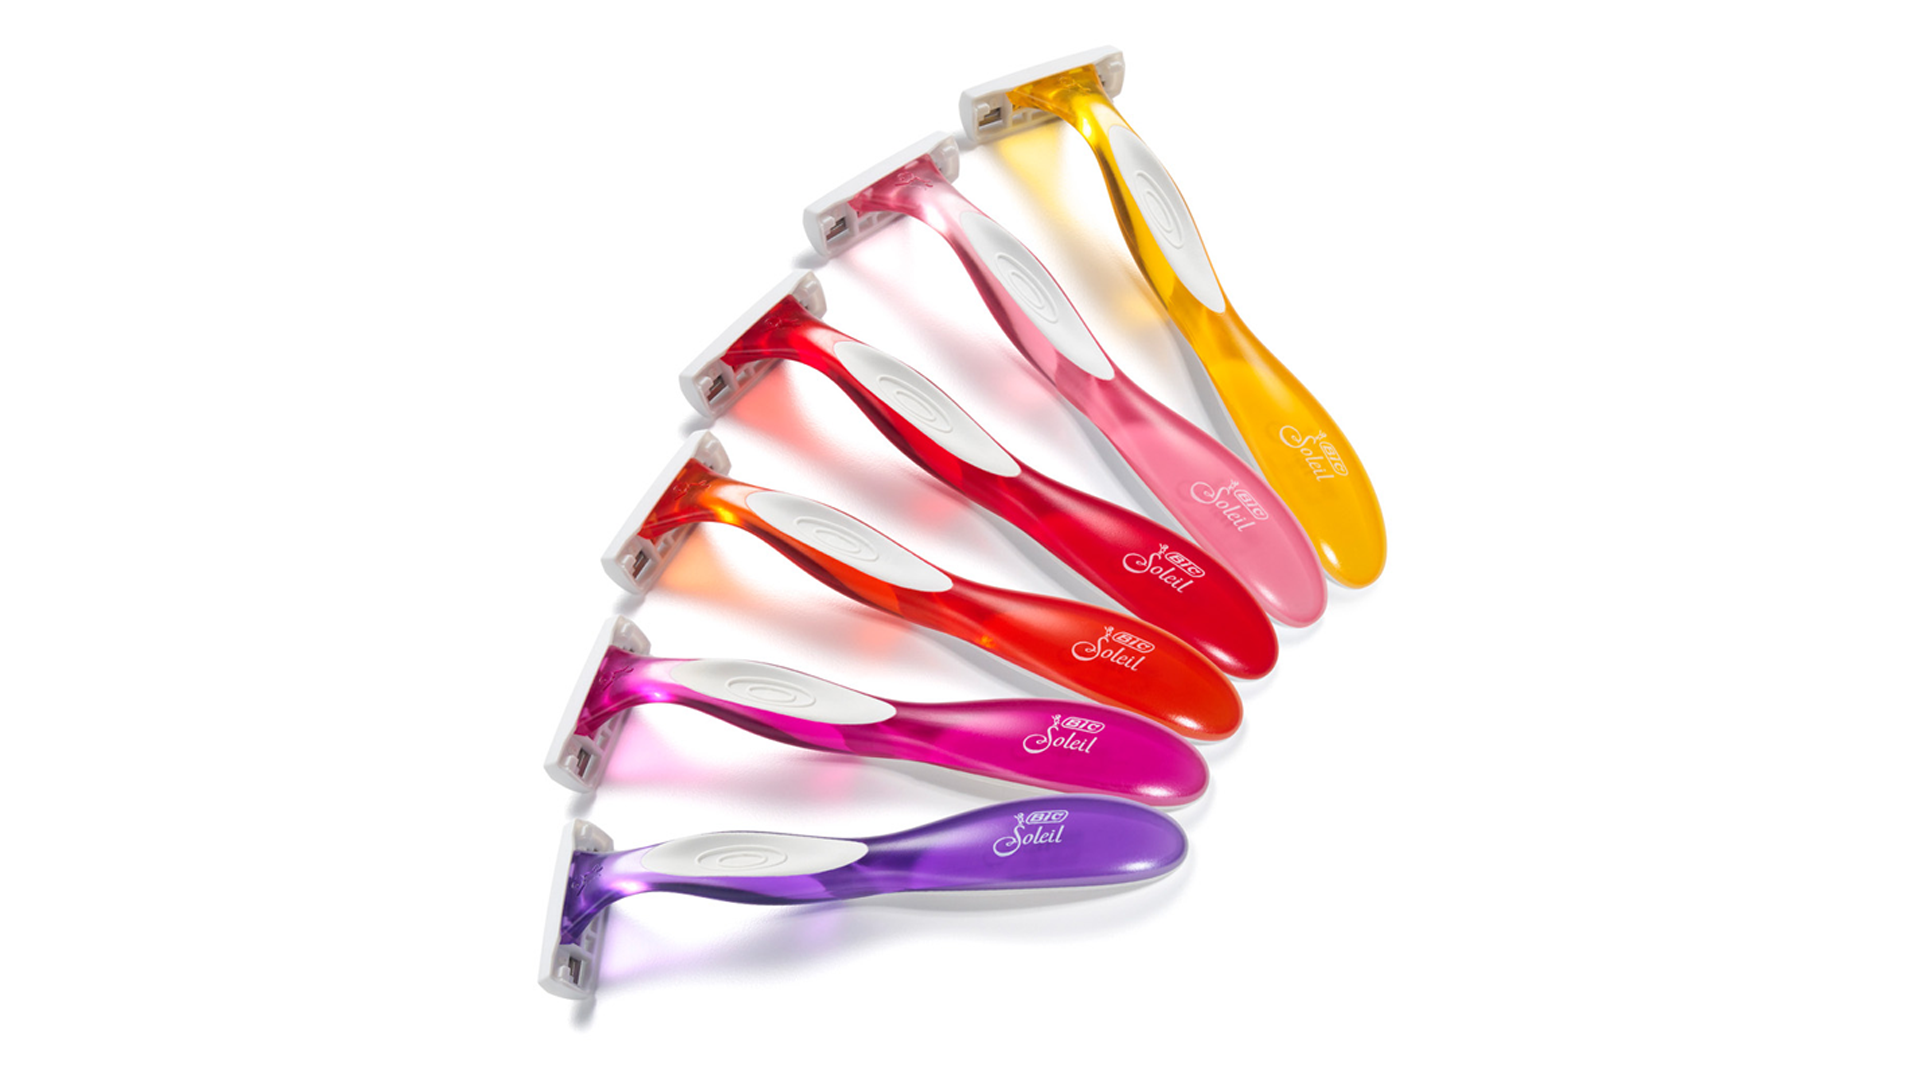
The practical application and efficacy of the "Steal That Shadow" technique were vividly demonstrated in a project undertaken by renowned photographer Anthony Nex. Nex had captured a series of six distinctively colored razors, each photographed individually on a pristine white background. The objective was to composite these separate images into a single, cohesive advertisement-ready image. The initial stages of the project involved standard compositing tasks: meticulous selection and masking of each razor, followed by their precise positioning within the intended layout to achieve the desired aesthetic balance. These steps, while foundational, represented only part of the challenge.
The critical juncture, the point at which the composite would either achieve compelling realism or betray its artificial origins, lay in the handling of the shadows. As Dunbar observed, "The part that made or broke the image was the shadows." It was here that the inherent wisdom of the "Steal That Shadow" approach became evident. Each original photograph of a razor had, by design, captured its natural shadow cast by the studio lighting. Instead of embarking on the arduous task of digitally fabricating new shadows that matched the composite’s imagined light source, Dunbar recognized the opportunity to leverage these pre-existing, authentic shadows. The solution, as it turned out, was literally "already in the photos." This realization underpinned the workflow, transforming a potentially complex shadow-creation task into an efficient extraction and integration process.
The Mechanics of "Steal That Shadow": A Photoshop Deep Dive
The technical implementation of Dunbar’s technique is both clever and robust, relying on fundamental Photoshop principles applied in a specific sequence. The workflow begins with the strategic layering of elements. The six individual razors, once masked and positioned, are typically organized within a dedicated layer group. Below this primary group, a ‘Shadows’ group is created. Crucially, each shadow layer within this group is a duplicate of its corresponding razor layer from the original shot, meaning it still contains both the razor and its original shadow on the white background.

Understanding Blending Modes: Darken and Multiply
The linchpin of this technique is the application of the ‘Darken’ blending mode to each of these duplicated shadow layers. Photoshop’s blending modes dictate how the pixels of one layer interact with the pixels of the layers beneath it. The ‘Darken’ mode operates by comparing the pixel values of the active layer with those of the underlying layers. For each pixel, it simply retains the darker of the two values. The critical advantage of ‘Darken’ in this context is its behavior with pure white. When a pixel on the ‘Darken’ layer is pure white, it has no effect on the underlying pixels; essentially, it becomes transparent, allowing the pixels from the layers below to show through.
This property is key: if the background of the original razor shot (which includes the shadow) can be coerced into pure white, then only the darker elements—the razor itself and its shadow—will remain visible when the ‘Darken’ mode is applied over the composite’s new background. The original article notes that ‘Multiply’ blending mode also works on a similar principle and is worth experimenting with, as it often produces slightly different tonal results. ‘Multiply’ darkens colors by multiplying the luminosity values of the blend color with the base color, creating a darker result. For shadows, both can be highly effective, and the choice often comes down to which produces a cleaner, more natural-looking edge and falloff for the specific image.
Achieving Pure White: The Critical Curves Adjustment
A common misconception in studio photography is that a "white" background is truly pure white (RGB 255, 255, 255). In practice, due to lighting nuances, reflections, and camera capture limitations, even the most carefully lit white background often registers as a very light gray. While subtle, these near-white values would still interact with the ‘Darken’ blending mode, leaving a faint, muddy residue or a noticeable halo around the extracted shadow. This compromises the illusion of seamless integration.

To counteract this, a ‘Curves’ adjustment layer is introduced. This adjustment layer is crucial and must be "clipped" directly to each individual shadow layer. Clipping ensures that the ‘Curves’ adjustment only affects the layer immediately below it, preventing unintended alterations to other parts of the composite. Within the ‘Curves’ adjustment panel, the user manipulates the white input slider. By dragging this slider to the left, all pixels within that shadow layer that are near-white are aggressively remapped to pure white. This forceful remapping is what guarantees that the ‘Darken’ blending mode will correctly ignore these background pixels, leaving only the actual shadow and the subject (which will eventually be masked out from the shadow layer, if desired, to only keep the shadow). While ‘Curves’ offers precise control and visual feedback, a ‘Levels’ adjustment layer can achieve a similar effect by manipulating its white point slider.
Refining Edges with Layer Masks
Even after the meticulous application of the ‘Darken’ blending mode and the ‘Curves’ adjustment, studio-shot shadows can sometimes exhibit subtle, almost imperceptible boundaries or slight imperfections at their perimeter. These can manifest as a barely visible line or a slight tonal shift where the extracted shadow layer ends. To ensure a completely natural and imperceptible blend into the new composite background, a layer mask is added to each shadow layer.
A layer mask provides non-destructive control over the visibility of a layer. By painting with a soft-edged black brush on this mask around the edges of the extracted shadow, the user can gently fade out any lingering artifacts or harsh transitions. This final finessing step ensures that the shadow appears to organically dissipate into the composite scene, just as a real shadow would, leaving no telltale signs of digital manipulation.

Beyond White Backgrounds: Universal Application
One of the most powerful aspects of Dunbar’s "Steal That Shadow" technique is its remarkable versatility. While the initial example and explanation focus on objects photographed against a white background, the methodology is not restricted to this specific scenario. The same core principles—the ‘Darken’ or ‘Multiply’ blending mode, a clipped ‘Curves’ adjustment to push background values to pure white, and a soft-edged layer mask for refinement—can be applied successfully to objects originally shot against any colored background.
The reason for this universal applicability lies in the fundamental operation of the ‘Darken’ blending mode. It performs a purely tonal comparison, pixel by pixel, without regard for the color information of the underlying layers. It simply identifies and retains the darker values. Therefore, whether the composite background is a vibrant blue, a muted gray, or a complex textured surface, the extracted shadow will interact naturally, as demonstrated by the razor composite successfully placed against a blue backdrop.
Handling Non-White Backgrounds
For original images captured on non-white colored backgrounds, an additional preparatory step is required to maintain shadow purity. Before the ‘Curves’ adjustment is applied, a ‘Hue/Saturation’ adjustment layer must be inserted and clipped directly above the shadow layer. This ‘Hue/Saturation’ layer is then used to fully desaturate the shadow layer, effectively converting the colored background (and any color cast in the shadow itself) into a neutral grayscale. The rationale behind this is crucial: if a colored background were directly pushed to white using ‘Curves’ without prior desaturation, any lingering color information could result in color contamination within the extracted shadow. This would manifest as an unnatural tint in the shadow area, betraying the composite. By first neutralizing the background to grayscale, the subsequent ‘Curves’ adjustment ensures that only pure white values are generated, preserving the integrity and natural appearance of the shadow.

The Broader Implications for Digital Artists
The "Steal That Shadow" technique represents more than just a clever Photoshop trick; it embodies a philosophical shift in compositing strategy. Instead of viewing original image data as merely raw material to be discarded or extensively manipulated, it champions the intelligent reuse of inherent photographic information. For digital artists, retouchers, and commercial photographers, the implications are substantial:
- Enhanced Realism: By incorporating real shadows, composites achieve a level of authenticity that is exceedingly difficult to replicate artificially, boosting the overall professional quality of the output.
- Increased Efficiency: The technique dramatically reduces the time and effort traditionally expended on manually creating and refining shadows. This efficiency translates directly into faster project turnaround times and reduced labor costs.
- Consistency Across Projects: When working with multiple products from the same shoot, the technique ensures a consistent quality and style of shadow, contributing to brand cohesion.
- Democratization of Advanced Techniques: Through platforms like KelbyOne, such sophisticated yet accessible techniques become available to a wider audience, empowering more artists to produce high-caliber work.
The advent of e-commerce and digital advertising has placed unprecedented demands on visual content creation. Brands require vast quantities of high-quality product imagery, often against diverse backgrounds, for websites, social media, and print. Techniques like "Steal That Shadow" are vital tools in meeting this demand, allowing for rapid adaptation of existing product shots to new marketing contexts without compromising visual fidelity.
Expert Perspectives: The Value of Efficiency and Realism
Industry experts underscore the value of such practical innovations. "The key to realism often lies not in creating from scratch, but in intelligently leveraging what’s already present in the source material," states Dennis Dunbar, emphasizing the core philosophy behind his technique. "When a photographer shoots product on a plain background, that shadow is a gift—real light, real falloff, real contact with a real surface. No painted shadow is going to beat it." This sentiment resonates with professional photographers like Anthony Nex, who benefits directly from the efficiency. "Knowing that the shadows I need are already embedded in my original shots, and that there’s a straightforward way to extract them, streamlines my post-production workflow immensely," Nex might observe, highlighting the practical advantages for client projects.

From an educational standpoint, platforms like KelbyOne play a crucial role in disseminating such knowledge. "Our mission is to equip our members with actionable, professional-grade techniques that directly enhance their skills and productivity," a spokesperson for KelbyOne could state. "Dennis Dunbar’s ‘Steal That Shadow’ method is a prime example of a technique that not only solves a common problem but does so with elegance and efficiency, truly empowering our community." The availability of comprehensive courses, such as Dunbar’s full KelbyOne class, "How to Build Believable Composites in Photoshop," further supports the continuous learning and skill development of digital artists worldwide.
Conclusion: The Art and Science of the Perfect Composite
The creation of believable digital composites is a nuanced blend of artistic vision and technical mastery. While the glamour often lies in the imaginative juxtaposition of elements, the true artistry often resides in the meticulous attention to details that ground those elements in reality. Dennis Dunbar’s "Steal That Shadow" technique offers a powerful testament to this principle, transforming a previously challenging aspect of compositing—the creation of realistic shadows—into an efficient, data-driven process. By intelligently re-purposing the authentic shadows captured during the initial photographic stage, digital artists can achieve an unparalleled level of realism, save significant time, and elevate the quality of their work across diverse applications. In an increasingly visual world, where authenticity is paramount, such innovations are not just helpful; they are essential for pushing the boundaries of what is possible in digital image creation. The next time a composite project arises with an original shot containing a natural shadow, the message is clear: don’t discard it. With the right blending mode and a clipped adjustment layer, that shadow is a valuable asset, ready to be put to work in crafting truly believable visual narratives.