In the intricate world of visual arts, from the still frame of photography to the dynamic sequences of videography, light stands as the singular, indispensable element. It is not merely a tool for exposure but the very language through which depth, emotion, and narrative are conveyed. Mastery of this language transcends the acquisition of sophisticated equipment, relying instead on a profound understanding and skillful manipulation of three fundamental principles: Intensity, Quality, and Direction. These tenets form the bedrock of effective illumination, transforming mere image capture into deliberate visual craftsmanship, applicable across both studio-controlled environments utilizing high-powered LEDs and strobes, and the ever-changing canvas of natural light.
The Historical Trajectory of Light in Visual Arts
The deliberate control of light for artistic expression is not a modern phenomenon but rather a practice deeply rooted in art history. Before the advent of photography, painters meticulously studied natural light, employing techniques like chiaroscuro to create dramatic contrasts between light and shadow, thereby achieving a sense of volume and three-dimensionality on a two-dimensional surface. Masters such as Caravaggio and Rembrandt pioneered these methods, demonstrating an early understanding of light’s intensity, quality, and direction to evoke specific moods and guide the viewer’s eye.
With the birth of photography in the 19th century, initial reliance was heavily placed on available natural light due to the low sensitivity of early photographic emulsions and the lack of reliable artificial sources. Photographers meticulously timed their shoots to coincide with optimal daylight conditions, showcasing an intuitive, albeit limited, engagement with light’s inherent principles. The invention of flash powder in the late 19th century marked a pivotal shift, introducing the first practical artificial light source that allowed for indoor photography and portraiture independent of the sun. This innovation, while crude by modern standards, laid the groundwork for photographers to actively shape light rather than merely record it.
The 20th century witnessed an explosion in lighting technology, from incandescent bulbs and continuous tungsten lights, which provided consistent illumination for early filmmaking, to the development of electronic flash units in the mid-century. Each technological leap offered greater control over light’s characteristics, gradually empowering visual artists to precisely dictate the aesthetic and emotional tenor of their work. The evolution continued with high-speed strobes, then compact fluorescent lights (CFLs), and most recently, light-emitting diodes (LEDs), which offer unprecedented flexibility in terms of intensity, color temperature, and power efficiency. This historical progression underscores a continuous quest for enhanced control over the three core principles, demonstrating their timeless relevance in the ever-evolving landscape of visual media.
Principle One: Intensity of Light – The Quantitative Foundation
Intensity, often conceptualized as the "volume knob" of a light source, refers to the sheer quantity of light emitted and subsequently impacting the subject. It is the most straightforward of the three principles to grasp and directly correlates with exposure settings in both photography and videography. On artificial light sources such as studio strobes or advanced LED panels, intensity is typically managed through physical dials, digital controls, or remote applications, allowing for precise power adjustments. In natural light scenarios, controlling intensity becomes a matter of adapting to environmental conditions or employing light-modifying accessories.
Technical Dimensions and Control:
The intensity of light is fundamentally measured in units like Lux (lumens per square meter) or Lumens (total light output), but its impact on an image is most commonly understood through the exposure triangle: aperture, shutter speed, and ISO.
- Aperture (f-stop): Controls the size of the lens opening, regulating how much light enters the camera. A wider aperture (smaller f-number) allows more light, effectively increasing the perceived intensity.
- Shutter Speed: Dictates the duration for which the camera’s sensor is exposed to light. A slower shutter speed allows more light over time, mimicking higher intensity.
- ISO: Represents the sensor’s sensitivity to light. A higher ISO amplifies the available light, making the scene appear brighter, though often at the cost of increased digital noise.
For natural light, direct control over the source’s intensity is impossible. However, photographers and videographers employ several strategies to manage it:
- Neutral Density (ND) Filters: These are grey-tinted filters that reduce the amount of light entering the lens without affecting color. They are indispensable for shooting in bright conditions, allowing for wider apertures or slower shutter speeds to achieve desired creative effects like shallow depth of field or motion blur.
- Reflectors and Flags: While primarily influencing direction and quality, reflectors can effectively increase the perceived intensity on a subject by bouncing ambient light, while flags (gobos) can block light, reducing intensity in specific areas.
- Time of Day: Understanding the sun’s position and intensity throughout the day (e.g., golden hour’s softer, less intense light versus midday’s harsh, high-intensity light) is crucial for natural light control.
Historically, the ability to control intensity was limited. Early flash powder provided a single, uncontrolled burst of light. The development of electronic flash units with variable power settings, and later continuous lights with dimmers, revolutionized this aspect, giving creators unprecedented command over exposure and the overall brightness of their scenes. While arguably the least artistically manipulative in terms of shaping light’s character, precise control over intensity is the bedrock upon which all other lighting decisions are built, ensuring correct exposure and setting the foundation for the visual narrative.

Principle Two: Quality of Light – The Character and Emotional Resonance
The quality of light delves into its inherent characteristics, encompassing a vast array of nuances that profoundly influence the aesthetic and emotional impact of an image or video. This principle examines how light behaves, how it interacts with the subject, and the specific attributes it imparts. It is arguably the most complex and debated principle due to the multitude of variables involved.
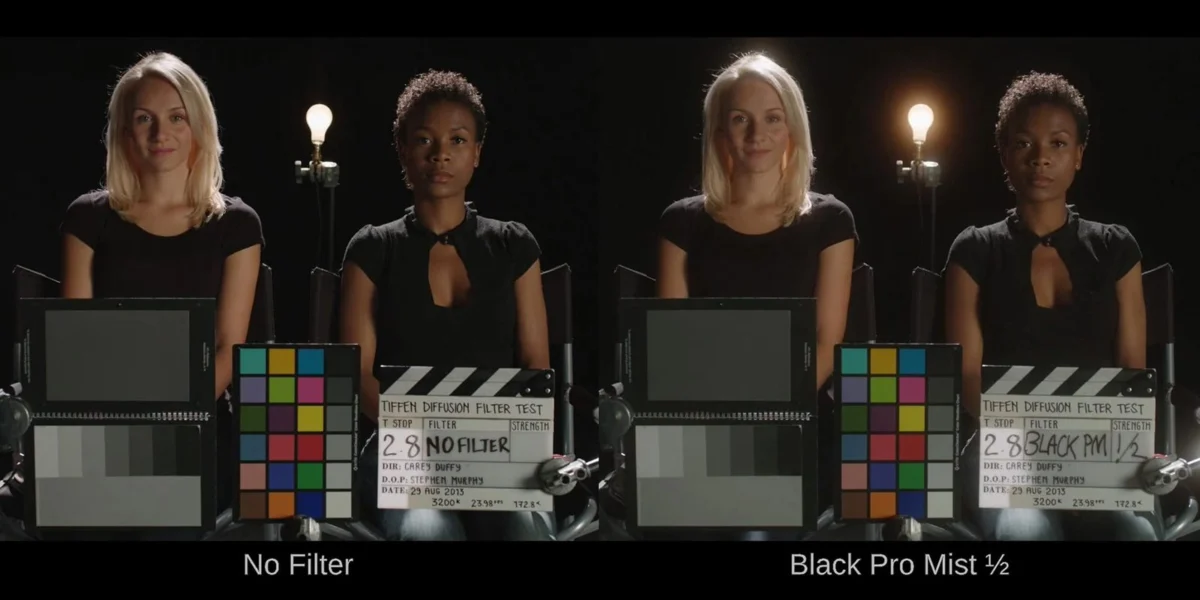
Hard Light vs. Soft Light:
The most fundamental distinction in light quality is between hard and soft light, determined by the apparent size of the light source relative to the subject.
- Hard Light: Originates from a relatively small light source (e.g., direct sunlight, a bare flash head) and creates sharp, well-defined shadows with abrupt transitions between light and dark. It emphasizes texture, detail, and can evoke a sense of drama, intensity, or harshness. Think of the stark shadows cast by midday sun or a direct spotlight.
- Soft Light: Emanates from a relatively large light source (e.g., an overcast sky, a large softbox, light bounced off a broad wall) and produces gradual shadow transitions with diffused edges. It minimizes harsh textures, flatters skin tones, and creates a more gentle, ethereal, or romantic mood. The gentle wrap-around light from a large window is a classic example of soft light.
Color Temperature and Spectral Purity:
Beyond its hardness or softness, light possesses a color temperature, measured in Kelvin (K). This metric describes the warmth or coolness of the light.
- Warm Light (Lower K): Ranges from the orange-red hues of candlelight (1,800K) and tungsten bulbs (3,200K) to the warm glow of sunrise/sunset (2,000-3,500K).
- Cool Light (Higher K): Includes the neutral white of daylight (5,500K), the blueish tint of overcast skies (6,500K), and specialized cinematic lights that can go even higher.
Accurate white balance in camera is essential to render colors naturally, but deliberate manipulation of color temperature through gels or specific light sources (e.g., RGB LEDs) can create powerful mood and atmosphere.
Spectral Purity (CRI/TLCI):
For professional applications, especially in videography and color-critical photography, the spectral purity of a light source is paramount.
- Color Rendering Index (CRI): A quantitative measure of a light source’s ability to reveal the colors of various objects faithfully in comparison with an ideal or natural light source. A CRI of 90+ is generally considered excellent.
- Television Lighting Consistency Index (TLCI): A newer, more robust standard specifically designed for broadcast television and digital cinema, as CRI was primarily developed for general illumination. A TLCI of 90+ ensures high fidelity for video capture.
Poor spectral purity can lead to inaccurate color reproduction, making subjects appear dull or off-color, regardless of correct white balance.
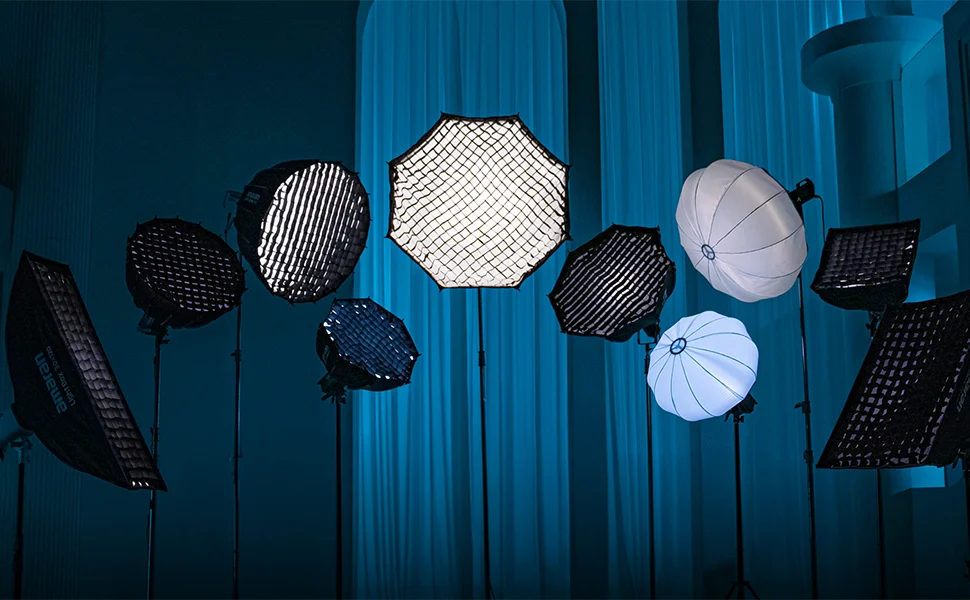
Modifiers and Their Impact:
The choice of light modifier directly dictates the quality of light.
- Reflectors: Can be silver (high specularity, punchier light), white (softer, more diffused bounce), or gold (warmer tones).
- Umbrellas: Offer a broad, soft light, with silver linings providing more contrast than white ones.
- Softboxes: Enclosed light sources with diffusion panels, creating highly controlled, soft light. Vary in shape and size, impacting light spread and falloff.
- Grids/Eggcrates: Attach to softboxes or reflectors to narrow the beam of light, controlling spill and increasing contrast without making the light harder.
- Fresnel Lenses: Produce a concentrated, adjustable beam of light with sharp shadows, characteristic of theatrical and cinematic lighting.
- Parabolic Reflectors: Known for their efficiency and ability to produce a unique light quality that is both focused and softly wrapping, allowing for precise control over specularity and falloff. As referenced, the Parabolic 45 is a favored choice for its distinctive output.
The quality of light is where much of the artistic expression resides. A photographer might choose a hard, undiffused light to accentuate the rugged texture of a landscape or the sharp lines of a product, while a videographer might opt for large, diffused sources to create a flattering, cinematic look for an interview subject. The constant innovation in light modifiers and LED technology reflects the ongoing pursuit of greater control over light’s nuanced character.
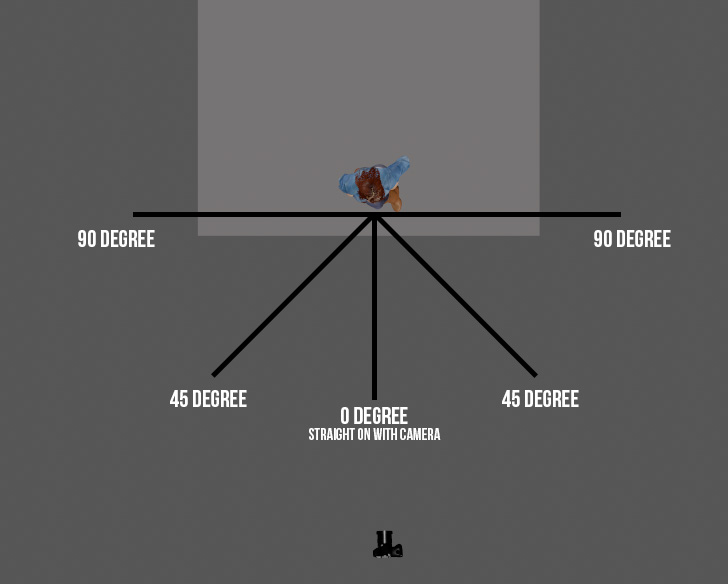
Principle Three: Direction of Light – Sculpting Form and Narrative
The direction of light refers to the angle and position of the light source relative to the subject and the camera. This principle is the most potent tool for creating a sense of depth, volume, and three-dimensionality in a two-dimensional medium. It sculpts the subject, revealing form, texture, and contours, while also dictating the appearance and shape of shadows, which are as crucial as the illuminated areas.
Key Lighting Positions and Their Effects:
- Frontal Lighting (0 degrees from camera axis): Light source positioned directly in front of the subject, often near the camera. It tends to flatten features, reducing shadows and making the subject appear less dimensional. While sometimes used for even illumination or high-key effects, it can lack drama.
- Broad Lighting: Light coming from the side but illuminating the side of the face or subject that is closer to the camera. This widens the perceived face or subject.
- Short Lighting: Light coming from the side but illuminating the side of the face or subject that is further from the camera, leaving the closer side in shadow. This narrows the perceived face or subject, often creating a more dramatic or sculpting effect.
- Rembrandt Lighting: A classic portrait lighting pattern where a triangle of light appears on the cheek opposite the main light source. Achieved by positioning the main light slightly to the side and above the subject, with the subject turned slightly away from the light. It adds depth and drama.
- Butterfly Lighting (Paramount Lighting): Positioned directly in front and above the subject, creating a butterfly-shaped shadow under the nose. It emphasizes cheekbones and is often used for glamour portraits.
- Split Lighting: Light coming from directly to one side of the subject (90 degrees), splitting the face into evenly lit and shadowed halves. Creates a dramatic, moody effect.
- Rim Lighting (Hair Light/Kicker): Positioned behind and to the side of the subject, creating a bright outline around the subject’s edges. Separates the subject from the background, adding depth and a luminous quality.
- Backlighting: Light source positioned directly behind the subject, creating a silhouette or a strong rim light. Can be used for dramatic effect, to emphasize shape, or to create a dreamy, ethereal feel.
- Underlighting: Light coming from below the subject. This is generally unnatural, as we perceive light primarily from above (the sun, overhead lights). Intentional use can create unsettling, eerie, or monstrous effects, effectively venturing into the "uncanny valley" to provoke a specific reaction.
The Role of Shadows:
Shadows are not merely the absence of light; they are integral to defining form and adding emotional depth. The direction of light directly dictates the length, shape, and intensity of shadows. Long, dramatic shadows can evoke mystery or solitude, while soft, subtle shadows create a gentle mood. Understanding how light direction creates these shadows is key to masterful lighting.
Multi-Light Setups:
In complex lighting scenarios, multiple lights are employed, each serving a specific directional purpose:
- Key Light: The primary light source, providing the main illumination and defining the subject’s form.
- Fill Light: A secondary, softer light source used to reduce the contrast created by the key light, softening shadows and revealing detail in darker areas. Often positioned on the opposite side of the key light.
- Hair Light/Rim Light: Provides separation from the background.
- Background Light: Illuminates the background, adding depth and interest to the scene.
Historically, the directional control of light moved from the single, often harsh, light of early flash photography to elaborate multi-light setups in Hollywood’s Golden Age, where cinematographers meticulously crafted light to shape actors’ faces and create iconic visual styles. Today, advanced light stands, boom arms, and precise positioning tools allow for infinite variations in light direction, enabling artists to sculpt their subjects with unparalleled precision.
The Interplay of Principles: A Symphony of Illumination
It is crucial to understand that Intensity, Quality, and Direction are not isolated variables but rather interconnected facets of a single phenomenon. Adjusting one principle invariably influences the others. For instance, moving a softbox closer to a subject (altering direction and perceived size) will not only increase the light’s intensity but also make it softer. Changing the power output (intensity) on a hard light source will maintain its hard quality but affect the overall exposure and the depth of shadows.
True mastery lies in orchestrating these three principles in concert to achieve a cohesive visual statement. A high-intensity, hard light from the side creates dramatic, high-contrast images, often used in film noir. Conversely, a low-intensity, soft light from the front, perhaps with a subtle rim light, produces a gentle, ethereal portrait. The ability to visualize the desired final image and then methodically manipulate intensity, quality, and direction to achieve that vision is the hallmark of a skilled visual artist.
Beyond the Studio: Applying Principles to Natural Light
While often discussed in the context of artificial lighting, these three principles are equally, if not more, vital when working with natural light. The sun, as the ultimate light source, continuously shifts in intensity, quality, and direction throughout the day and across seasons.
- Intensity: The sun’s intensity is highest at midday, requiring ND filters or faster shutter speeds. It lessens during the golden hour, offering a more manageable range.
- Quality: The sun’s quality changes from harsh and direct at midday (hard light) to soft and diffused on an overcast day or during sunrise/sunset (soft light). Atmospheric conditions like haze or clouds act as natural diffusers.
- Direction: The sun’s direction is constantly changing, moving from east to west and varying in height. Understanding this trajectory allows photographers to anticipate shadow placement and use natural backlighting, side lighting, or front lighting to their advantage.
Mastering natural light involves "reading" these shifts and positioning subjects strategically or using simple modifiers like reflectors to redirect or soften the available light. It’s about recognizing the inherent qualities of the environment and adapting the principles to harness them effectively.
Broader Impact and Implications
The profound impact of these three lighting principles extends across the entire spectrum of visual communication. In advertising, carefully sculpted light enhances product appeal, creating desire and trust. In cinematography, lighting is a primary narrative device, conveying mood, foreshadowing events, and revealing character psychology. A scene lit with harsh, directional light might suggest tension or conflict, while soft, ambient light could evoke warmth or intimacy. In documentary photography, understanding natural light ensures authenticity and impact, allowing the photographer to capture genuine moments without disrupting the scene. Even in fields like forensics or medical imaging, precise control over light’s intensity, quality, and direction is critical for revealing specific details or conditions.
For aspiring and seasoned professionals alike, continuous learning and experimentation with these principles are essential. They are not rigid rules but flexible guidelines, offering a framework for creative exploration. As technology advances, providing ever more sophisticated tools, the fundamental understanding of intensity, quality, and direction remains the timeless core of effective visual storytelling. The journey from simply "taking a picture" to "crafting an image" is paved with the deliberate and intelligent manipulation of light.
Further Reading and Expert Resources:
- Which Light Modifier Do You Choose for Your Photography Session?
- Why You Need to Consider Parabolic Reflectors in Your Work
- How the Light Placement Alters Your Subjects
- How Your Flashtube Position and Shape Changes Your Light Quality